Table of Contents
In this article, we will see how to add a service accounts key in Google Cloud in 7 Easy Steps. Many times you might got a scenario where you need to access Google Cloud resources programmatically or deploy or run some piece of code using a script or program. All these tasks can only be accomplished if you generate and use a Service Accounts Key or else GCP won't allow to perform any operation on its resources. Here we are going to look all the steps in detail required to add a Service Account Key in GCP. More on Google Cloud docs.
How to Add a Service Accounts Key in Google Cloud
Also Read: Step by Step Guide to Configure Jenkins Master-Slave Setup on GCP
Step 1: Prerequisites
a) You should have a valid Google Email ID and Password.
b) You should have access to Create Service Accounts and add Keys.
Step 2: Go to Service Accounts
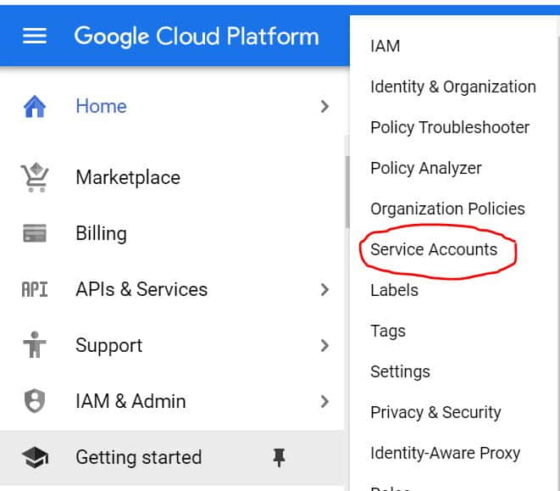
In the first step, you need to go to Service Accounts from Google Cloud Dashboard as shown below. Click on IAM & Admin->Service Accounts.
Step 3: Create Service Account
You will see a screen like below. Here you need to click on Create Service Account.

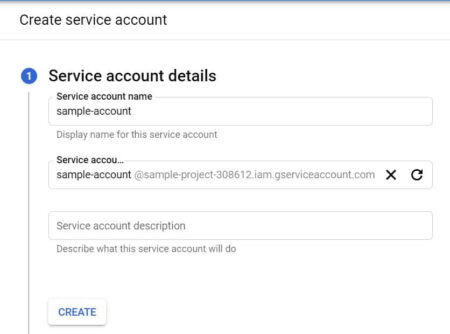
Then provide the Service account name and Service Account ID as shown below. For our example we are using sample-account as Service Account name and sample-account@sample-project-308612.iam.gserviceaccount.com as Service Account ID. Once given, click on Create.
Step 4: Add Role(Optional)
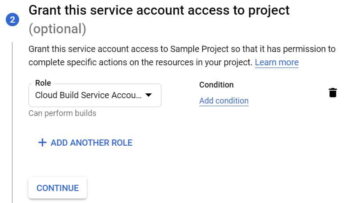
Here you can see an optional step to Grant this Service Account access to perform some specific tasks. For example, to run cloud build script we need to assign Cloud Build Service Account Role as shown below. If you don't want to assign, then you can just leave it and Click on Continue.
Step 5: Grant Users Access to this Service Account(Optional)
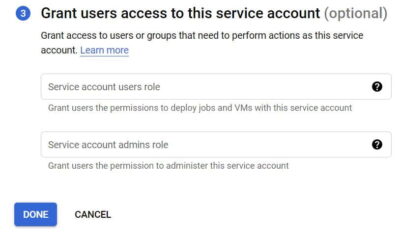
This is also an optional step where you can Grant User access to this service account. For now, we are leaving it blank and directly Clicking on Done.
This will create our required Service Account as shown below. You can also notice from below screen that as of now there are no keys added to this account. So our next step is to Create and add a key here.

Step 6: Click on Manage Keys
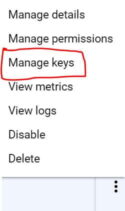
To create a new key, you need to select the earlier created Service account and then click on 3 dot showing at the extreme right end. Here you need to select Manage Keys option as shown below.
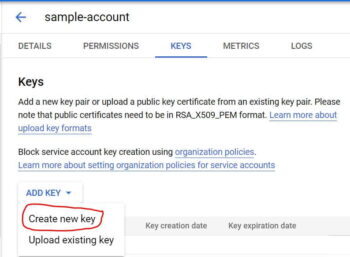
After clicking on Manage Keys, you will get below option to add key. Once you click the down arrow showing next to Add Key option, you will see an option to Create new key. You need to click on this option.
Step 7: Create JSON/P12 Key
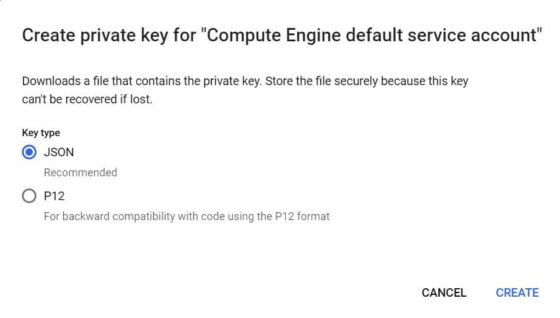
Finally, you need to select the type of key you need to generate. Since here we need to generate private key in JSON format so we will click the JSON radio button and then click on Create. It will download the private key in your local system in .json format. Now you can go ahead and use this key to access Google Cloud Resources programmatically.
