Table of Contents
In this article, we will see how to install mail command on Ubuntu 22.04 LTS (Jammy Jellyfish). mail command is a very popularly used free and open source utility that allows users to send and receive emails through command line interface(CLI) or terminal. It provides the flexibility to send email through script after executing a set of tasks. It is also very easy to install and use. Since mail command is available through mailutils package on Ubuntu/Debian based systems so to install mail utility you need to install mailutils package by following the steps given in below section.

How to Install mail command on Ubuntu 22.04 LTS (Jammy Jellyfish)
Also Read: How to Install mail command on Ubuntu 20.04 LTS (Focal Fossa)
Step 1: Prerequisites
a) You should have a running Ubuntu 22.04 LTS Server.
b) You should have sudo or root access to run privileged commands.
c) You should have apt or apt-get utility available in your Server.
Step 2: Update Your Server
It is important to have the system updated with the latest available package versions and security patches to deal with the detected vulnerabilities. This can be done by running sudo apt update && sudo apt upgrade command as shown below.
cyberithub@ubuntu:~$ sudo apt update && sudo apt upgrade
[sudo] password for cyberithub:
Hit:1 http://in.archive.ubuntu.com/ubuntu jammy InRelease
Get:2 http://security.ubuntu.com/ubuntu jammy-security InRelease [110 kB]
Get:3 https://dl.google.com/linux/chrome/deb stable InRelease [1,825 B]
Get:4 http://in.archive.ubuntu.com/ubuntu jammy-updates InRelease [119 kB]
Get:5 https://artifacts.elastic.co/packages/8.x/apt stable InRelease [10.4 kB]
Get:6 http://in.archive.ubuntu.com/ubuntu jammy-backports InRelease [108 kB]
Get:7 https://dl.google.com/linux/chrome/deb stable/main amd64 Packages [1,080 B]
Get:8 https://artifacts.elastic.co/packages/8.x/apt stable/main i386 Packages [5,629 B]
Get:9 https://artifacts.elastic.co/packages/8.x/apt stable/main amd64 Packages [56.9 kB]
Get:10 http://security.ubuntu.com/ubuntu jammy-security/main i386 Packages [278 kB]
Get:11 http://in.archive.ubuntu.com/ubuntu jammy-updates/main amd64 Packages [855 kB]
Get:12 http://security.ubuntu.com/ubuntu jammy-security/main amd64 Packages [634 kB]
Get:13 http://in.archive.ubuntu.com/ubuntu jammy-updates/main i386 Packages [456 kB]
Get:14 http://in.archive.ubuntu.com/ubuntu jammy-updates/main Translation-en [209 kB]
................................................................
Step 3: Install mail command
Now to install mail command, you need to install mailutils package from default Ubuntu repo by using sudo apt install mailutils command as shown below. This will download and install the package along with all its dependencies.
cyberithub@ubuntu:~$ sudo apt install mailutils
[sudo] password for cyberithub:
Reading package lists... Done
Building dependency tree... Done
Reading state information... Done
The following additional packages will be installed:
gsasl-common guile-3.0-libs libgsasl7 libmailutils8 libmysqlclient21 libntlm0 libpq5 mailutils-common mysql-common postfix
Suggested packages:
mailutils-mh mailutils-doc procmail postfix-mysql postfix-pgsql postfix-ldap postfix-pcre postfix-lmdb postfix-sqlite sasl2-bin | dovecot-common
resolvconf postfix-cdb postfix-mta-sts-resolver postfix-doc
The following NEW packages will be installed:
gsasl-common guile-3.0-libs libgsasl7 libmailutils8 libmysqlclient21 libntlm0 libpq5 mailutils mailutils-common mysql-common postfix
0 upgraded, 11 newly installed, 0 to remove and 2 not upgraded.
Need to get 11.5 MB of archives.
After this operation, 70.4 MB of additional disk space will be used.
Do you want to continue? [Y/n] y
.....................................................
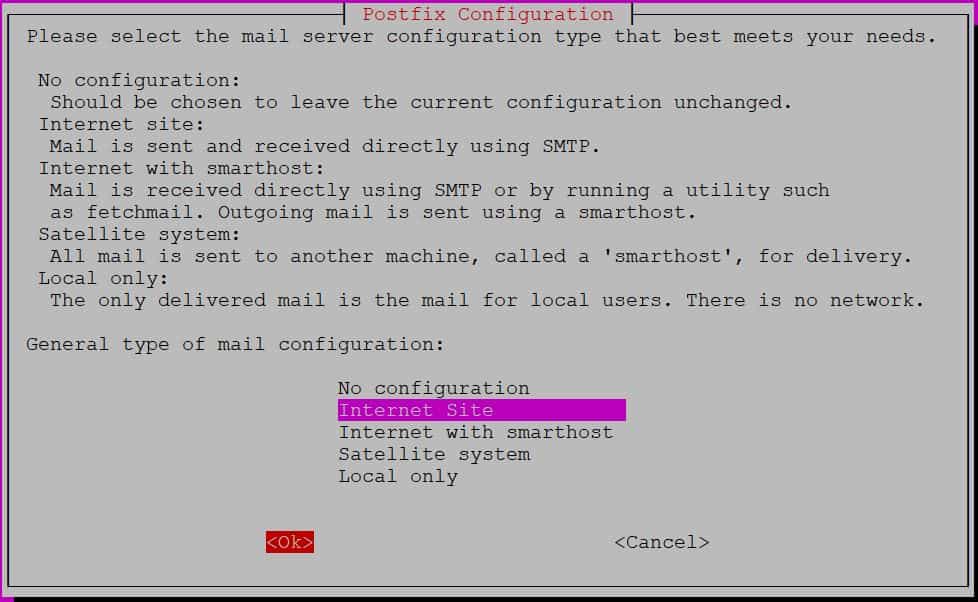
During installation, it will ask you to select the mail server configuration type as you can see below. You can select the appropriate configuration type as per your need and requirement.

Below are the different mail server configuration type available to use:-
- No Configuration: If you don't want to change current configuration then select this configuration.
- Internet Site: If you want to send and receive email directly using SMTP then select this configuration type.
- Internet with smarthost: If you want to receive mail directly using SMTP or by running a utility such as fetchmail where the outgoing mail will be sent using a smarthost then select this configuration.
- Satellite system: If you want to send all the mails to another host called a smarthost for delivery then you need to select this configuration.
- Local only: If you do not have to connect a network and use it locally then you need to select this configuration type.
Once mail configuration type is selected, use Tab and enter to click OK and proceed with the installation. Next, it will ask you to provide the system mail name which is nothing but the domain name used to "qualify" __ALL__ mail addresses without a name. For now, we are just giving it as ubuntu but you should be giving fully qualified domain name. Once given, use Tab to click Ok and proceed further.

If everything goes well, then in a while installation will be completed successfully.
Step 4: Verify Installation
After successful installation, you can verify the installed files path by using dpkg -L mailutils command as shown below.
cyberithub@ubuntu:~$ dpkg -L mailutils
/.
/usr
/usr/bin
/usr/bin/decodemail
/usr/bin/dotlock.mailutils
/usr/bin/frm.mailutils
/usr/bin/from.mailutils
/usr/bin/mail.mailutils
/usr/bin/messages.mailutils
/usr/bin/mimeview
/usr/bin/movemail.mailutils
/usr/bin/readmsg.mailutils
/usr/bin/sieve
/usr/share
/usr/share/doc
........................................................
Step 5: Check Version
You can also check the current installed version by running mail --version command as shown below.
cyberithub@ubuntu:~$ mail --version
mail (GNU Mailutils) 3.14
Copyright (C) 2007-2022 Free Software Foundation, inc.
License GPLv3+: GNU GPL version 3 or later <http://gnu.org/licenses/gpl.html>
This is free software: you are free to change and redistribute it.
There is NO WARRANTY, to the extent permitted by law.
Step 6: Sent test mail
Now that mail utility is installed, we can send a test email to check the usage of the tool. This can be done by running below mail command. In this command, we are sending an email with subject "Hello Email" and message "Hi, This is from CyberITHub" to sender cyberithub@ubuntu.
cyberithub@ubuntu:~$ echo "Hi, This is from CyberITHub !!" | mail -s "Hello Email" cyberithub@ubuntu
- -s: specify the subject line
After sending the mail, you can verify the delivery by checking the contents of /var/spool/mail/cyberithub file using tail -f /var/spool/mail/cyberithub command as shown below.
cyberithub@ubuntu:~$ tail -f /var/spool/mail/cyberithub
id 113A6401455; Tue, 1 Aug 2023 00:56:37 +0530 (IST)
Subject: Hello Email
To: <cyberithub@ubuntu>
User-Agent: mail (GNU Mailutils 3.14)
Date: Tue, 1 Aug 2023 00:56:37 +0530
Message-Id: <20230731192638.113A6401455@ubuntu>
From: cyberithub <cyberithub@ubuntu>

Hi, This is from CyberITHub
Step 7: Check all Available Options
If you are looking to check all the options available with mail utility then you can check it by running mail --help command as shown below.
cyberithub@ubuntu:~$ mail --help
Usage: mail [OPTION...] [address...]
or: mail [OPTION...] [OPTION...] [file]
or: mail [OPTION...] --file [OPTION...] [file]
or: mail [OPTION...] --file=file [OPTION...]
GNU mail -- process mail messages.
If -f or --file is given, mail operates on the mailbox named by the first
argument, or the user's mbox, if no argument given.

-A, --attach=FILE            attach FILE
-a, --append=HEADER: VALUE   append given header to the message being sent
    --[no-]alternative       force multipart/alternative content type
    --attach-fd=FD           attach from file descriptor FD
    --content-filename=NAME
                             set the Content-Disposition filename parameter for
                             the next --attach option
    --content-name=NAME      set the Content-Type name parameter for the next
    --attach option
    --content-type=TYPE      set content type for subsequent --attach options
-E, --exec=COMMAND           execute COMMAND
-e, --exist                  return true if mail exists
    --encoding=NAME          set encoding for subsequent --attach options
-F, --byname                 save messages according to sender
..........................................................
Step 8: Uninstall mail command
If anytime, you decide to remove mail utility from your system then you can easily do that by running sudo apt remove mailutils command as shown below. This will ask you to confirm the removal of packages. Press Y to confirm and remove.
cyberithub@ubuntu:~$ sudo apt remove mailutils
[sudo] password for cyberithub:
Reading package lists... Done
Building dependency tree... Done
Reading state information... Done
The following packages were automatically installed and are no longer required:
gsasl-common guile-3.0-libs libgsasl7 libmailutils8 libmysqlclient21 libntlm0 libpq5 mailutils-common mysql-common
Use 'sudo apt autoremove' to remove them.
The following packages will be REMOVED:
mailutils
0 upgraded, 0 newly installed, 1 to remove and 2 not upgraded.
After this operation, 559 kB disk space will be freed.
Do you want to continue? [Y/n] Y
(Reading database ... 233220 files and directories currently installed.)
Removing mailutils (1:3.14-1) ...
Processing triggers for man-db (2.10.2-1) ...
