Table of Contents
In this article, we will see how to install SSL Certificate on Red Hat Linux Apache. There are many reasons to use the Red Hat Linux Apache Server. It is reliable, super fast, and possesses enough power to create a secure operating environment. The Linux-based operating system works on desktops, hypervisors, and in the cloud.
Although the Red Hat Linux Apache Server comes with security features, it requires to entirely secure it. In a world where cybersecurity threats are rising rapidly, it is wise that you secure all resources. You need additional security, such as the SSL certificate, to boost Red Hat Linux Apache security. This article will pass you through a step-by-step guide to installing an SSL certificate on Red Hat Linux Apache Server. So let us get started.

How To Install SSL Certificate on Red Hat Linux Apache
Also Read: How to convert XLSX file to XLS or CSV file in Linux
Step 1: Generating a Certificate Signing Request (CSR) and Private Key
The certificate signing requested (popularly abbreviated as CSR) refers to a small text file that contains all relevant information about the domain ownership and other pertinent details about your company. Generating the certificate signing request is a fundamental step in any SSL installation process.
You will have to execute the following command to generate a certificate signing request as well as a private key:-

Upon generating the certificate signing request and the private key, you will be prompted to input various details related to your certificate signing request. Such details include the following:-
- Country name
- State/province name
- Name of company
- Organization unit name
Once you fill in these details and hit the enter key, your private keys and the certificate signing request are saved automatically in the default SSL directory. You can execute the following command to view your CSR:-

You should save the certificate signing request in a .txt file and proceed to the next step.
Step 2: Ordering and Configuring the SSL Certificate
It is now time to order the SSL certificate. You can buy plenty of SSL certificates based on your specific needs. So before you buy SSL certificate, ensure you have a clear glimpse of what the certificate will offer. For instance, if yours is a simple website with a single domain, going for a standard SSL certificate will be a great choice. EV SSL certificates are excellent choices for high-profile websites that store sensitive data. Different certificate authorities offer excellent SSL certs, such as the DigiCert SSL, Comodo SSL, and many more.
Once you buy SSL certificate, it is time to begin the SSL configuration process. You should open the main certificate file using a text editor or notepad and copy all contents of the certificate as shown below:-

Step 3: Uploading the SSL certificate Files on Your Server
Upon issuance of the SSL certificate, the certificate authority that issued the certificate will email you directly with all details about the certificate. Apache users will have to install the certificates individually. An alternative way to establish the CA certificates is using the bundle method. To do this, start by copying the PEM formatted bundle CA file to the local location of your directory. This location will be the storage spot for all the CA bundle files. Proceed to the next step.
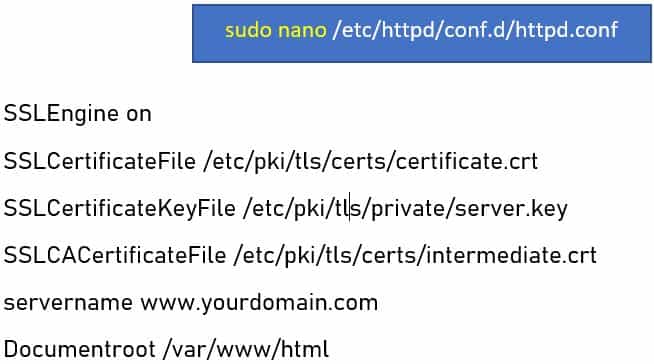
Step 4: Configuring the Httpd SSL Parameters
Run the command below:-
![]()
The next thing to do involves editing the secure web server configuration file and relocating or modifying the directives, as shown in the screenshot below.

Save the modification and exit the buffer. You can verify the changes using the following command.
![]()
A prompt with a Syntax Ok will appear if the configuration is correct. If not, you should make the necessary corrections until your configuration is correct.
Step 5: Configuring the httpd Virtual Host
You should run the following command.

You should change yourdomain.com to your desired domain name. You should then proceed to verify the changes using the following command:-
![]()
A prompt with a Syntax ‘Ok’ will appear if the configuration is correct. If not, you should make the necessary corrections until your configuration is correct.
Step 6: Updating the Firewall Settings
The next step involves updating the firewall settings by adding the service and the port number to the firewall.

Step 7: Enabling and Restarting the Httpd Service
Run the following commands to enable and restart the httpd service.

Step 8: Checking Your SSL Installation
It would be wise to confirm that the SSL certificate is configured correctly and efficiently. You should use the SSLLabs test tool to check if your SSL certificate has been installed appropriately.
Conclusion
Your Red Hat Linux Apache server needs an SSL certificate to secure itself from attackers. Installing the SSL certificate on the Red Hat Linux Apache server can be a bit daunting, especially if you are not tech-savvy. But following the steps in this guide will make the task easy for you.
