Table of Contents
In this article, I will take you through the steps to install uGet Downloader Manager on Ubuntu 20.04 LTS. uGet is a free and open source GTK+ based download manager available to use in variety of platforms (and operating systems) for laptop, desktop and mobile. It provides unique number of features and options to manage the download according to user convenience and hence making it an ideal download manager to use. It is also very easy to install in almost all the platforms. Here we are going to look into the steps to install uGet download manager on Ubuntu 20.04 LTS based systems.
Important Features
- It allows to download files in many segments to increase the download speeds.
- It supports integration with browsers like Firefox, Google Chrome, Opera, Chromium via an extension.
- It offers the ability to download video from Youtube using Youtube API.
- It allows users to add unlimited number of files in a batch to the queue for automatic downloading.
- It allows users to pause and resume download as per the convenience hence avoiding the download to start from beginning.
- It provides the ability to schedule the download at any days and at any time in a week.
- It also provides the ability to download the files from command line rather than exclusively using Graphical User Interface(GUI).
- It supports download using number of protocols including HTTP, HTTPS, FTP, BitTorrent*, & Metalinks.
- It allows users to import download from HTML files.

How to Install uGet Download Manager on Ubuntu 20.04 LTS
Also Read: How to Install R Programming on Ubuntu 20.04 LTS (Focal Fossa)
Step 1: Prerequisites
a) You should have a running Ubuntu 20.04 LTS Server.
b) You should have sudo or root access to run privileged commands.
c) You should have apt or apt-get utility available in your Server.
Step 2: Update Your Server
Before going to install uget on your server, it is highly recommended to first install all the available updates and then upgrade the packages to the latest version from default Ubuntu repo by using sudo apt update && sudo apt upgrade command as shown below.
cyberithub@ubuntu:~$ sudo apt update && sudo apt upgrade
Hit:2 http://in.archive.ubuntu.com/ubuntu focal InRelease
Get:3 http://security.ubuntu.com/ubuntu focal-security InRelease [114 kB]
Get:4 https://cloud.r-project.org/bin/linux/ubuntu focal-cran40/ InRelease [3,622 B]
Hit:5 https://dl.google.com/linux/chrome/deb stable InRelease
Hit:6 https://deb.tableplus.com/debian/20 tableplus InRelease
Get:7 http://in.archive.ubuntu.com/ubuntu focal-updates InRelease [114 kB]
Hit:1 https://downloads.apache.org/cassandra/debian 40x InRelease
Get:8 http://in.archive.ubuntu.com/ubuntu focal-backports InRelease [108 kB]
Get:9 http://security.ubuntu.com/ubuntu focal-security/main amd64 DEP-11 Metadata [59.9 kB]
Get:10 http://in.archive.ubuntu.com/ubuntu focal-updates/main amd64 Packages [2,384 kB]
Get:11 http://security.ubuntu.com/ubuntu focal-security/universe amd64 DEP-11 Metadata [94.1 kB]
Get:12 http://security.ubuntu.com/ubuntu focal-security/universe DEP-11 48x48 Icons [45.5 kB]
Get:13 http://security.ubuntu.com/ubuntu focal-security/universe DEP-11 64x64 Icons [94.9 kB]
..........................................................
Step 3: Install uGet
In the next step, you can install uGet by using any of the below methods depending on your requirement.
a) Using Ubuntu Repo
You can choose to install uget from default Ubuntu repo by using sudo apt install uget command as shown below. This will download and install the package along with all its dependencies.
cyberithub@ubuntu:~$ sudo apt install uget
Reading package lists... Done
Building dependency tree
Reading state information... Done
The following NEW packages will be installed:
uget
0 upgraded, 1 newly installed, 0 to remove and 1 not upgraded.
Need to get 372 kB of archives.
After this operation, 1,586 kB of additional disk space will be used.
Get:1 http://in.archive.ubuntu.com/ubuntu focal/universe amd64 uget amd64 2.2.2-1 [372 kB]
Fetched 372 kB in 1s (349 kB/s)
Selecting previously unselected package uget.
(Reading database ... 183556 files and directories currently installed.)
Preparing to unpack .../uget_2.2.2-1_amd64.deb ...
Unpacking uget (2.2.2-1) ...
Setting up uget (2.2.2-1) ...
Processing triggers for mime-support (3.64ubuntu1) ...
Processing triggers for hicolor-icon-theme (0.17-2) ...
Processing triggers for gnome-menus (3.36.0-1ubuntu1) ...
Processing triggers for man-db (2.9.1-1) ...
Processing triggers for desktop-file-utils (0.24-1ubuntu3) ...
b) Using PPA Repo
You also have the option to install stable version of uGet from PPA repo. It is also the recommended you to install. For that you need to first add the PPA repo using sudo add-apt-repository ppa:plushuang-tw/uget-stable command as mentioned in the official website.
cyberithub@ubuntu:~$ sudo add-apt-repository ppa:plushuang-tw/uget-stable
This PPA is for the stable version of uGet.

This project was created in 2003-01-23.
SourceForge.net project page : http://sourceforge.net/projects/urlget/
Homepage : http://urlget.sourceforge.net/

uGet (formerly called urlgfe) is a download manager. It allows you to classify download, and allows you to import download from HTML files. Every category has an independent configuration that can be inherited by each download in that category.
More info: https://launchpad.net/~plushuang-tw/+archive/ubuntu/uget-stable
Press [ENTER] to continue or Ctrl-c to cancel adding it.
..................................................
After adding the repo, you need to update the package cache by using sudo apt update command as shown below.
cyberithub@ubuntu:~$ sudo apt update
Then install uget from the PPA repo by using sudo apt install uget command as shown below.
cyberithub@ubuntu:~$ sudo apt install uget
Step 4: Verify Installation
After successful installation, you can verify the installed files by using dpkg -L uGet command as shown below.
cyberithub@ubuntu:~$ dpkg -L uGet
/.
/usr
/usr/bin
/usr/bin/uget-gtk
/usr/bin/uget-gtk-1to2
/usr/share
/usr/share/applications
/usr/share/applications/uget-gtk.desktop
/usr/share/doc
/usr/share/doc/uget
/usr/share/doc/uget/changelog.Debian.gz
/usr/share/doc/uget/copyright
/usr/share/icons
/usr/share/icons/hicolor
/usr/share/icons/hicolor/128x128
/usr/share/icons/hicolor/128x128/apps
/usr/share/icons/hicolor/128x128/apps/uget-icon.png
/usr/share/icons/hicolor/16x16
/usr/share/icons/hicolor/16x16/apps
/usr/share/icons/hicolor/16x16/apps/uget-icon.png
................................................
Step 5: Check Version
You can also check the current installed version by using uget-gtk --version command as shown below.
cyberithub@ubuntu:~$ uget-gtk --version
uGet 2.2.2 for GTK+
Step 6: Launch uGet
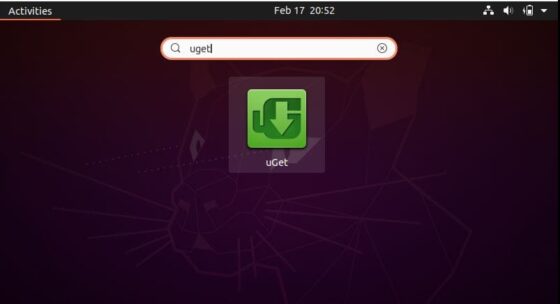
To launch uGet, you need to go to Desktop and click on Activities. Then you need to type uget in the search bar as shown below. Once the application shows up, tap on it to open.

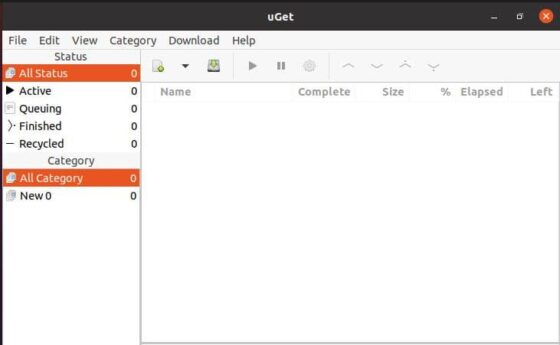
Once it opens, it should show like below.

Step 7: Uninstall uGet
Once you are done using uGet, you can choose uninstall it from your System by using sudo apt remove uget command as shown below.
NOTE:
cyberithub@ubuntu:~$ sudo apt remove uget
Reading package lists... Done
Building dependency tree
Reading state information... Done
The following packages will be REMOVED:
uget
0 upgraded, 0 newly installed, 1 to remove and 2 not upgraded.
After this operation, 1,586 kB disk space will be freed.
Do you want to continue? [Y/n] Y
(Reading database ... 198882 files and directories currently installed.)
Removing uget (2.2.2-1) ...
Processing triggers for mime-support (3.64ubuntu1) ...
Processing triggers for hicolor-icon-theme (0.17-2) ...
Processing triggers for gnome-menus (3.36.0-1ubuntu1) ...
Processing triggers for man-db (2.9.1-1) ...
Processing triggers for desktop-file-utils (0.24-1ubuntu3) ...
