Table of Contents
In this article, we will see how to release old IP or force renew DHCP lease IP in Linux. Dynamically allocated IP is an IP leased out from a DHCP server for a particular amount of time over a network. If you are using a lease IP then you always have to renew your ip before the lease period expires. Usually, when a lease reaches 50% of its validity time period, the DHCP client unicasts a DHCP Request message to the DHCP server to request lease renewal. The same can be forced manually through a dhcp client tool in Linux Systems.
What is DHCP
The Dynamic Host Configuration Protocol is a network management protocol used on Internet Protocol networks for automatically assigning IP addresses and other communication parameters to devices connected to the network using a client–server architecture.
How to Release old IP or force Renew DHCP Lease IP in Linux
Also Read: How to Install Doxygen on Ubuntu 20.04 LTS (Focal Fossa)
If you have any DHCP lease IP allocated to an interface which you want to release due to certain reasons then you always have the option to release it by using DHCP client tool called dhclient. For example, in my case I have two interfaces attached to my system - enp0s3 and enp0s8.
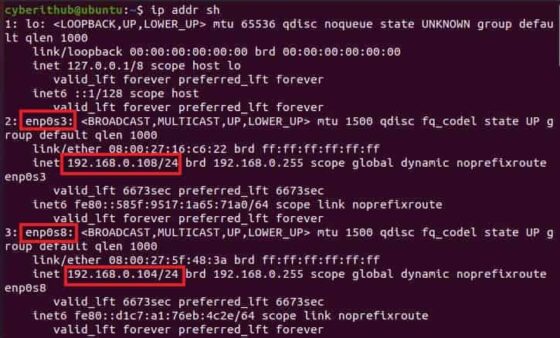
To release the IP attached to both the above interfaces, we need to use sudo dhclient -r -v command. But sometimes what happens is that the IP does not get released as you can see below.
NOTE:
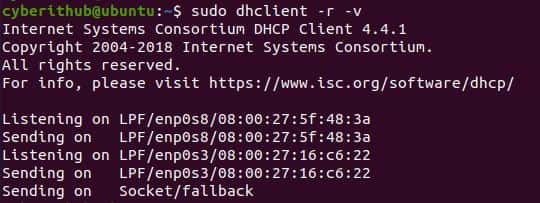
If we try to check again the IP got released or not using ip addr sh command then we can notice that nothing happened. The assigned IP did not got released.

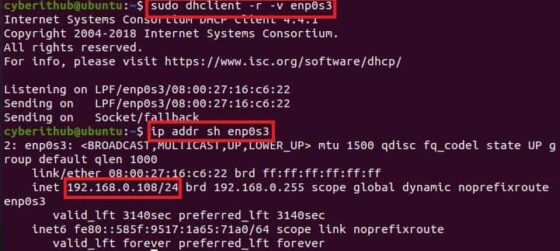
If you try to release IP from specific interface by choosing the interface using sudo dhclient -r -v enp0s3 command then also you can notice that the IP did not got released. This is a very common scenario faced by lot of folks hence I purposefully chosen this one while trying to explain how to release the DHCP lease IP so that you will understand what needs to be done here.
Sometimes even if you try to kill the dhclient process using kill -9 <PID> command then you will notice that it is getting started every time you kill this process and the IP is not getting changed. To check the process ID of currently running dhclient program, you can use ps -ef | grep dhclient command
In my case process ID(PID) is 2167, so to kill this one we are using kill -9 2167 command. Now if I try to check the process again, I can see that a new dhclient command is launched with process ID(PID) 2169. So now you must be wondering how did this happen.
Well, this happened because the network interfaces are currently controlled by Network Manager. You can verify this on Debian/Ubuntu systems by checking one of the below netplan configuration file depending on Ubuntu installation you are currently having.
- 01-netcfg.yaml
- 01-network-manager-all.yaml
- 50-cloud-init.yaml
NOTE:
/etc/sysconfig/network-scripts/ifcfg-<interface_name> configuration file.
You can check the running status of Network Manager by using sudo systemctl status NetworkManager command as shown below.
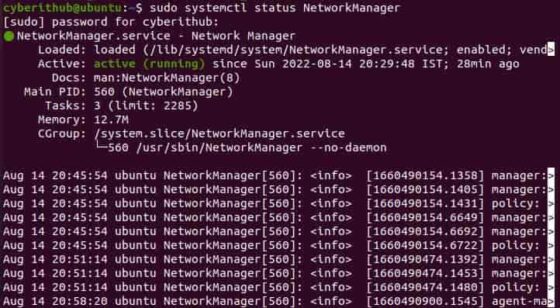
If you are also facing problems like above, then you can try below solutions that works for you.
Solution 1: Restart Network Manager
First solution you can try is that you can restart Network Manager by running sudo systemctl restart NetworkManager command as shown below.
![]()
Solution 2: Using nmcli command
If the first solution does not work then next you can try restarting your connection using nmcli command. Here you need to first check the current connection using nmcli con command as shown below.

Then first take down the connection for the interface where you need to renew the IP. In our case, let's say we want to renew the IP of enp0s3 interface, then we need to run nmcli con down id "Wired Connection 1" command after releasing the IP as shown below.
![]()
Then bring up the connection using nmcli con up id "Wired connection 1" command as shown below.
![]()
Solution 3: Restart systemd-networkd
If second solution also did not worked out, then you can try restarting systemd-networkd once by using sudo systemctl restart systemd-networkd command as shown below.
![]()
After applying above solution, you can see that you will be able to release the IP as shown below.
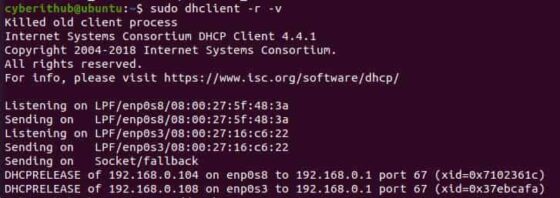
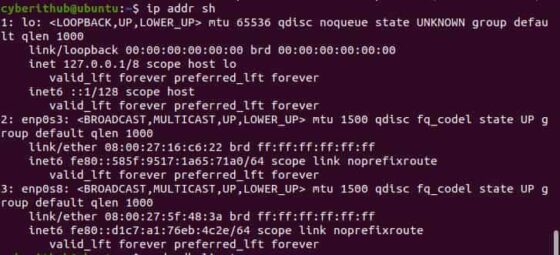
You can verify the same by checking the status of ip assigned to network interfaces using ip addr sh command as shown below. From the output, you can see that none of the IP is assigned to both the interfaces - enp0s3 and enp0s8. This confirms that IP release was successful.
Once the IP is released, you will be able to get the new ip by running sudo dhclient -v command as shown below.

